BMP 280 is a digital absolute barometric pressure sensor from Bosch Sensortec. This sensor is especially designed for mobile applications where small dimension and low power consumption is very important. Today we will see what exactly BMP 280 pressure sensor is all about and how we can use it in our various applications including application with Arduino.
As per Wikipedia
Atmospheric pressure, sometimes also called barometric pressure, is the pressure within the atmosphere of Earth (or that of another planet). In most circumstances atmospheric pressure is closely approximated by the hydrostatic pressure caused by the weight of air above the measurement point. As elevation increases, there is less overlying atmospheric mass, so that atmospheric pressure decreases with increasing elevation. Pressure measures force per unit area, with SI units of pascals (1 Pa = 1 N/m2). On average, a column of air one square centimetre [cm2] (0.16 sq in) in cross-section, measured from sea level to the top of the Earth’s atmosphere, has a mass of about 1.03 kilograms (2.3 lb) and weight of about 10.1 newtons (2.3 lbf). That weight (across one square centimeter) is a pressure of 10.1 N/cm2 or 101 kN/m2 (kPa). A column 1 square inch (6.5 cm2) in cross-section would have a weight of about 14.7 lb (6.7 kg) or about 65.4 N.
Atmospheric pressure is caused by the gravitational attraction of the planet on the atmospheric gases above the surface, and is a function of the mass of the planet, the radius of the surface, and the amount of gas and its vertical distribution in the atmosphere. It is modified by the planetary rotation and local effects such as wind velocity, density variations due to temperature and variations in composition.

BMP 280 is based on piezo-resistive pressure sensor technology, having high accuracy, linearity and stability with EMC robustness.
BMP 280 can be used in various applications like Enhancement of GPS navigation systems, Indoor navigation like Floor detection & Elevator detection, Outdoor navigation, Sports applications, Weather forcast, Vertical velocity indication etc.
BMP 280 Pressure sensor technical specification –
Dimension – 2.0 * 2.5 * 0.95 mm
Operating range – Pressure – 300…..1100 hPa, Temperature – 0 …+65 Degree Centigrade
Supply Voltage – 1.71 V – 3.6 V.
Interface – I2C and SPI
Average current – 2.74 micro Ampere
Resolution – Pressure – 0.18 Pa ( eqiuv. to <10 cm), Temperature – 0.01 K
Pins diagram –

BMP 280 Pressure sensor operation:-
The sensor has two kind of communication interface – I2C and SPI through which you can extract the sensor data.
We can operate the sensor in basically two modes.
1. Normal Mode – In this mode the sensor automatically cycles between a measurement nad standby period. This mode is used generally with built in IIR filter when there are short term disturbances during the usual measurement. For example when you blow to the sensor, the pressure will varry in short period of ttime.
2. Forced Mode – In this mode the sensor performs a single measurement on request and then returns to sleep mode. This is best suited to the cases where we poll the data whenever we require it. This is generally used in applications where low sampling rate is required like weather monitoring.
There is also a feature where we can oversample the measurement of pressure & temperature.Depending upon application and power requirement, we can set oversampling rate of 1,2,4,8 or 16.
There are easy default settings, which are optimized to cater several example cases like weather monitoring, indoor navigation, drop detection, elevetor detection etc.
As this sensor is of very small size, it becomes very difficult to handle by any hobbyist person. So we have to use breakout boards, which not only provides all the required connecting pin outs but also with required components to use it directly with any microcontroller or popular boards like Arduino.
Because the size of sensor is very small and very difficult to handle by any hobbyist, we have to use BMP 280 Pressure sensor module, which has got all the required connections at normal 2.54 mm pitch pin connector.
BMP 280 pressure sensor module-

How to connect BMP 280 pressure sensor module with arduino –
Connect the sensor with Arduino UNO as shown below.
Wiring – sensor and Arduino:
VCC–> 3.3v
GND–> GND
SCL/SCK –> A5(Analog pin 5)
SDA/SDI –> A4(Analog pin 4)

First of all, get the BMP 280 Library from Github at https://github.com/adafruit/Adafruit_BMP280_Library
Put it in to arduino library folder. Now you have to do one change in Adafruit_BMP280.h file. Change the IIC address of the sensor to 0x76.
Copy the following sketch and upload to UNO board.
/***************************************************************************
This is a library for the BMP280 humidity, temperature & pressure sensor

Written by Limor Fried & Kevin Townsend for Adafruit Industries.
BSD license, all text above must be included in any redistribution

sketch adopted & modified by Jayprakash Shet , www.arnin.in
***************************************************************************/

#include Wire.h
#include SPI.h
#include Adafruit_Sensor.h
#include Adafruit_BMP280.h

// only used if we are using SPI to communicate with sensor

#define BMP_SCK 13
#define BMP_MISO 12
#define BMP_MOSI 11
#define BMP_CS 10

// Here we are using IIC

Adafruit_BMP280 bmp; // I2C
//Adafruit_BMP280 bmp(BMP_CS); // hardware SPI
//Adafruit_BMP280 bmp(BMP_CS, BMP_MOSI, BMP_MISO, BMP_SCK);

void setup() {
Serial.begin(9600);
Serial.println(F("BMP280 test"));

if (!bmp.begin()) {
Serial.println(F("Could not find a valid BMP280 sensor, check wiring!"));
while (1);
}
}

void loop() {
Serial.print(F("Temperature = "));
Serial.print(bmp.readTemperature());
Serial.println(" *C");

Serial.print(F("Pressure = "));
Serial.print(bmp.readPressure());
Serial.println(" Pa");

Serial.print(F("Approx altitude = "));
Serial.print(bmp.readAltitude(1013.25)); // this should be adjusted to your local forcase
Serial.println(" m");

Serial.println();
delay(2000);
}
BMP 280 pressure sensor test arduino sketch-
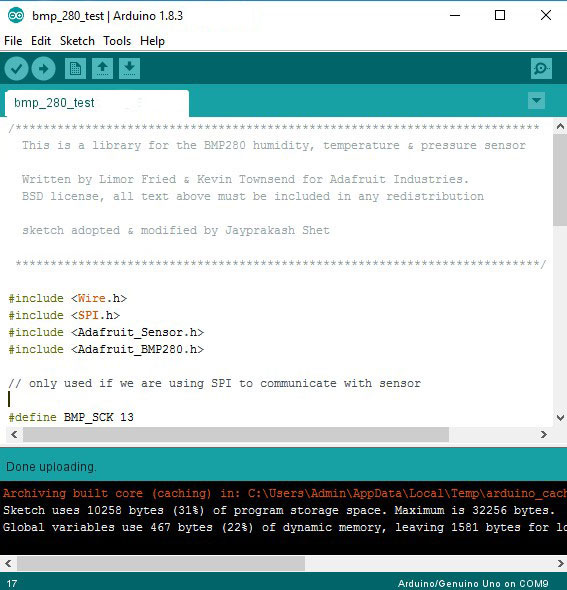
Once you upload the sketch, open the serial monitor where you will get the parameters displayed as under –

That is it, as you have seen, it is very easy to use BMP-280 pressure sensor with Arduino. If you have any problems, do let us know, we will help you out. You can contact us at support@arnin.in.
Happy pressurizing !










+ There are no comments
Add yours