


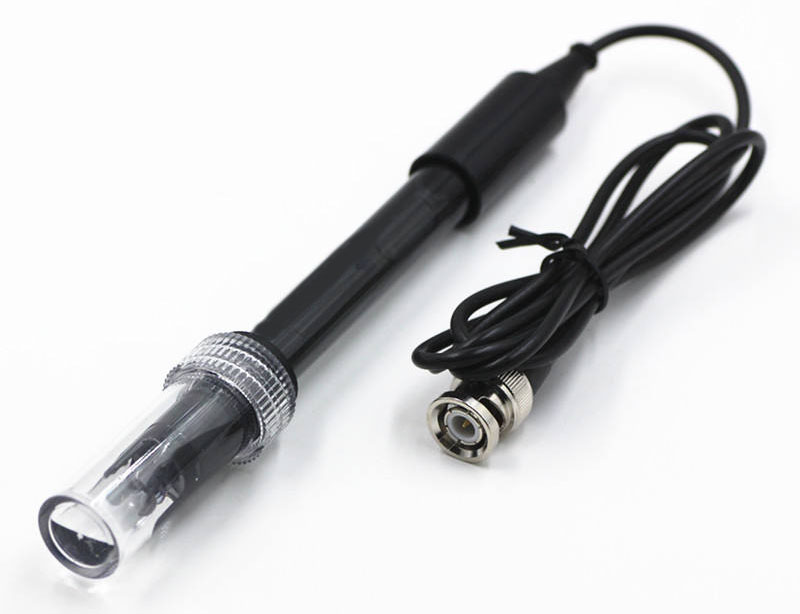
Exploring Liquid pH Measurement with pH Sensor Module for Arduino
Introduction
Within the expansive realm of electronics and sensor technology, the Liquid pH Sensor Module, paired with a pH Electrode Probe boasting a BNC connector, introduces a plethora of possibilities for monitoring and controlling liquid pH levels. This potent combination proves invaluable in applications like hydroponics, aquariums, water quality monitoring, and scientific experiments. In this article, we’ll dive into the technical intricacies and features and illustrate how to seamlessly integrate this sensor module with an Arduino for efficient pH measurement.
Technical Details
The Liquid pH Value Detect Sensor Module, coupled with a pH Electrode Probe featuring a BNC connector, forms a robust and precise pH measurement system. The pH Electrode Probe, acting as the system’s core, directly interacts with the liquid, offering real-time pH data.
The BNC connector, a standard type for pH electrodes, ensures compatibility and user-friendly connectivity. It establishes a secure and dependable link between the pH electrode and the pH Sensor Module, enabling swift replacement or interchangeability of different pH electrodes.
The pH Electrode Probe operates based on electrochemical cells. Submerged in a liquid, the probe generates a voltage signal proportional to the hydrogen ion concentration in the solution. The pH Sensor Module interprets this voltage, transforming it into a pH value that accurately represents the liquid’s acidity or alkalinity.
While the sensor module typically arrives with a pre-calibrated pH electrode, occasional calibration might be necessary for long-term accuracy, especially under extreme conditions or frequent use.
Technical specifications:
Heating voltage: 5 ± 0.2V (AC · DC)
Working current: 5-10mA
Detectable concentration range: pH 0-14
Detection Temperature range: 0-80 ℃
Response time: ≤5S
Settling Time: ≤60S
Component Power: ≤0.5W
Working temperature: -10 ~ 50 ℃ (nominal temperature 20 ℃)
Humidity: 95% RH (nominal humidity 65% RH)
Module Size: 42mm × 32mm × 20mm
Output: Analog voltage signal output
Features
- Wide pH Range: The pH Sensor Module accommodates a broad pH range, making it versatile for various applications, allowing users to monitor solutions from highly acidic to highly alkaline.
- Accuracy and Precision: The pH Electrode Probe, in tandem with the sensor module, delivers precise and accurate pH measurements, crucial for applications requiring specific pH levels.
- BNC Connector: Ensures a reliable and standardized connection, widely used in pH measurement equipment, facilitating easy replacement and compatibility with other electrodes.
- Easy Integration: Designed for seamless integration with microcontrollers like Arduino, making it accessible for hobbyists, students, and professionals across diverse projects and experiments.
- Durable Construction: The pH Electrode Probe is typically built with durable materials, ensuring stability in different environments, which is crucial for applications in harsh conditions or continuous monitoring setups.
- Temperature Compensation: Advanced sensor modules may feature temperature compensation, providing more accurate pH readings under varying environmental conditions.

Connecting the Liquid pH Sensor Module with Arduino
Integrating the pH Sensor Module with Arduino is a straightforward process. Here’s a step-by-step guide:
Components Needed:
- Arduino Board (e.g., Arduino Uno)
- Liquid pH Sensor Module + pH Electrode Probe BNC
- BNC to Female Jumper Wires
- Breadboard and Jumper Wires
- Power source for Arduino (USB cable or battery)
Connection Steps:
- Connect the pH Electrode Probe to the Liquid pH Sensor Module:
- Plug the BNC connector into the BNC port on the pH Sensor Module.
- Ensure a secure connection to prevent signal interference.
- Connect the Liquid pH Sensor Module to Arduino:
- Connect the VCC pin of the sensor module to the 5V pin on the Arduino.
- Connect the GND pin of the sensor module to the GND pin on the Arduino.
- Connect the Analog Out pin of the sensor module to any analog input pin on the Arduino.
- Power the Arduino:
- Power the Arduino using a USB cable connected to a computer or a suitable power source.
- Upload the Arduino Sketch:
- Use the provided sample Arduino sketch to read pH values from the pH Sensor Module and display them on the serial monitor.
Arduino sketch for pH sensor –
// pH Sensor Module + pH Electrode Probe BNC
// pH Sensor Module + pH Electrode Probe BNC
int analogPin = A0; // Analog input pin for pH sensor
float pHValue; // Variable to store pH value
void setup() {
Serial.begin(9600); // Initialize serial communication
}
void loop() {
// Read the analog value from the pH sensor
int sensorValue = analogRead(analogPin);
// Convert the analog value to pH using a suitable calibration factor
pHValue = map(sensorValue, 0, 1023, 0, 14); // Adjust the mapping based on calibration
// Print the pH value to the serial monitor
Serial.print(“pH Value: “);
Serial.println(pHValue, 2); // Print pH value with two decimal places
delay(1000); // Delay for one second before taking the next reading
}
Note: Calibration should be performed using standard pH solutions to ensure accurate readings.
Interpreting the Results
After uploading the sketch, open the Arduino IDE serial monitor to observe the pH values being read from the sensor. The displayed values will indicate the acidity or alkalinity of the liquid being measured.
Conclusion
The pH Sensor Module, combined with a pH Electrode Probe featuring a BNC connector, proves to be a powerful tool for monitoring and controlling pH levels in liquids. Its wide range, accuracy, and easy integration with microcontrollers like Arduino make it suitable for diverse applications, from hydroponics and aquariums to scientific research.
We have seen an in-depth look at the technical details, features, and a step-by-step guide on connecting the sensor module with Arduino. With the sample Arduino sketch, you can begin exploring pH measurements in your projects, laying the foundation for innovative applications in fields such as agriculture, environmental monitoring, and beyond. As technology advances, the incorporation of such sensors into everyday projects becomes increasingly accessible, fostering a new era of exploration and experimentation.
You may also like:
A4988 Stepper Motor Driver With Arduino.
DRV8825 STEPPER MOTOR DRIVER WITH ARDUINO.


+ There are no comments
Add yours